
Back to Interface PlugITs content page
"Web navigator" PlugIT
The "Web Navigator" PlugIT allows to use a web site in order to use it as an interface, menu or as a texture.
Parameters |
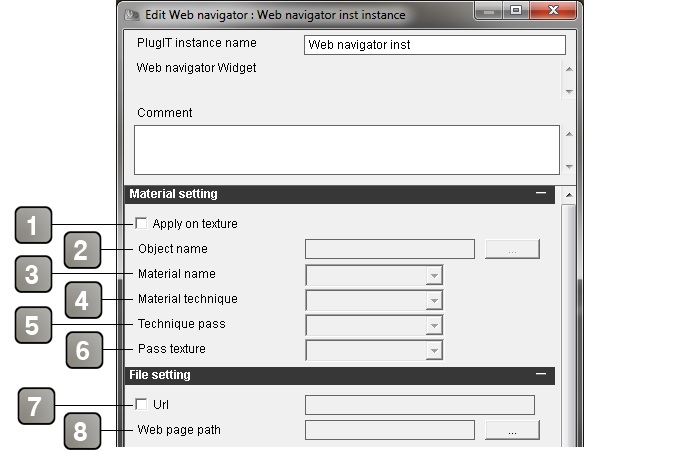
1 |
Allows you to set a web interface to an object. This parameter enables the (2) (3) (4) (5) (6) points and locks the (1) (2) (3) (12) (13) points of the other part. |
2 |
Allows to search an object in your scene you want to apply a web interface. |
3 |
Allows to apply the web interface on a material. |
4 |
Allows to apply a web interface on a material technique. |
5 |
Allows to apply the web interface on a pass technique. |
6 |
Allows to apply the web interface on a pass texture. |
7 |
Enable/Disable the url use. Use the "http://" url type in the text field. |
8 |
Allows to use a HMTL in your computer. the HTML needs to be in your SCOL file/partition. example: C:\Users\Irvin\Documents\Scol Voyager\Partition_LocalUsr\project\media |
Parameters |
|
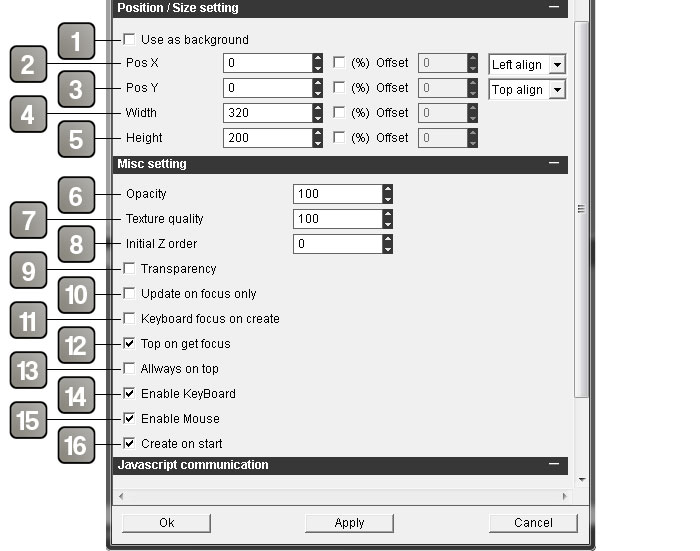
1 |
Use the background. |
9 |
Set the X position of your web interface. By default, units are in pixels. But you can check "%" in order to set in percentage and enable the offset parameter; this one is set in pixel and allows to slide your web interface (here Right to Left). A drop-down list allows to set the web interface to the left, center or the right directly without using the numerical parameters. The "%" applies on the width of your screen and will deformate your web interface. |
10 |
Set the Y position of your web interface. By default, units are in pixels. |
11 |
Set the witdh of your web interface. By default, units are in pixels. |
12 |
Set the height of your web interface. By default, units are in pixels. |
6 |
Opacity of the web site. |
7 |
Set the texture quality |
8 |
Set the display order of the image in the scene. Set a value if you have conflict between several images. It will be used if the web interface is in 2D. |
9 |
Enable the transparency of your web page. |
10 |
Update the web page when the mouse is detected on the web interface. |
11 |
Allows to use the keyboard directly when the application starts. |
12 |
Allows the web interface to be on top when a mouse click is activated on it. |
13 |
Set the web interface always on top. |
14 |
Allows the keyboard control on the web interface. |
15 |
Allows the mouse control on the flash interface. |
16 |
Create the web control when the application starts. |
Parameters |
|
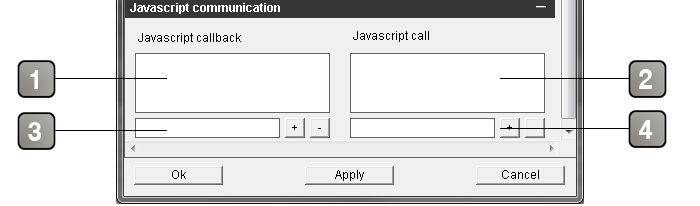
1 |
"Javascript callbacks" recuperate events from the javascript to an other PlugIT. Use the function described in 3 in order to add events. Firstly, you need to create the calls in the Javascript code of you web page. It can be variables. |
2 |
«Javascript Calls» send parameters to the flash. |
3 |
Enter the name of the callback then click on + ; if you want to delete it, select it in the 1, then click on -. |
4 |
Enter the name of the call then click on + ; if you want to delete it, select it in the 4, then click on -. |
Action |
|
Change web page source |
Allows to change the web page source. For this, set the URL or the position relative to the SCOL file/partition in the link value. |
Create |
Creates the web page. |
Destroy |
Destroys the web page. |
Hide |
Hides the web page. |
Refresh |
Refreshs the web page. |
Set opacity |
Allows to set the opacity value of your image. To the '0' value, the image is totally transparent, to '100' it is non-transparent. |
Set position |
Changes the web interface position. For this, edit the adapted link, adding a value under the X Y (for example 10 25). |
Set size |
Changes the web interface size. For this, edit the adapted link, adding a value in the form W H (for example 320 200). |
Show |
Displays the web page. |
Zoom In |
Zoom in the web page |
Zoom Out |
Zoom out the web page |