
Group materials and Material editor
Group materials
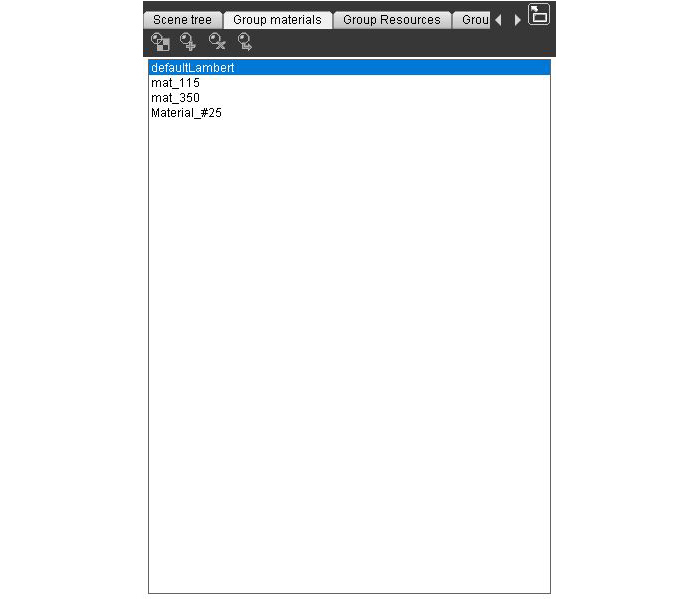
The Openspace3D "Group materials" tab shows every material loaded in the group. It allows you to create, edit, delete and assign your materials.
Selecting an object in the 3d edit interface automatically select its material in this tab.
IMPORTANT NOTE : Every addition, edition or deletion is definitely saved only after the scene is saved. Exiting a scene without saving it will cancel every change realized
on the materials since the last save.
"Group materials" tab exemple with a few materials :
Icon |
Name |
Definition |
|
Edit |
Open the material editor for the selected material. Can also be opened by double-clicking the material you want to edit. |
|
Add |
Add or create a new material for the group. See below for more details. |
|
Delete |
Delete the selected material. |
|
Assign |
Assign the selected material to the selected object in the 3D edit interface. |
Add or create a material
When you want to add a new material, you are faced with this interface :
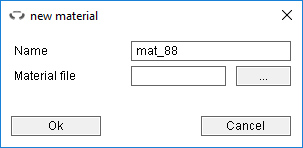
The first field is the name of your material. it is filled with a default name, that you can change.
The second field is the location where your material is saved. If you select an already existing .material file, the material(s) in this file will be loaded.
If you enter a new file name, a new material will be created.
Material editor
The material editor allows to change a lot of a material parameters such as its render mode, its colors, or its textures. To open it, click on the "edit" button or double-click on the material you want to edit. You can also assign the material from the editor with the button above the material preview.
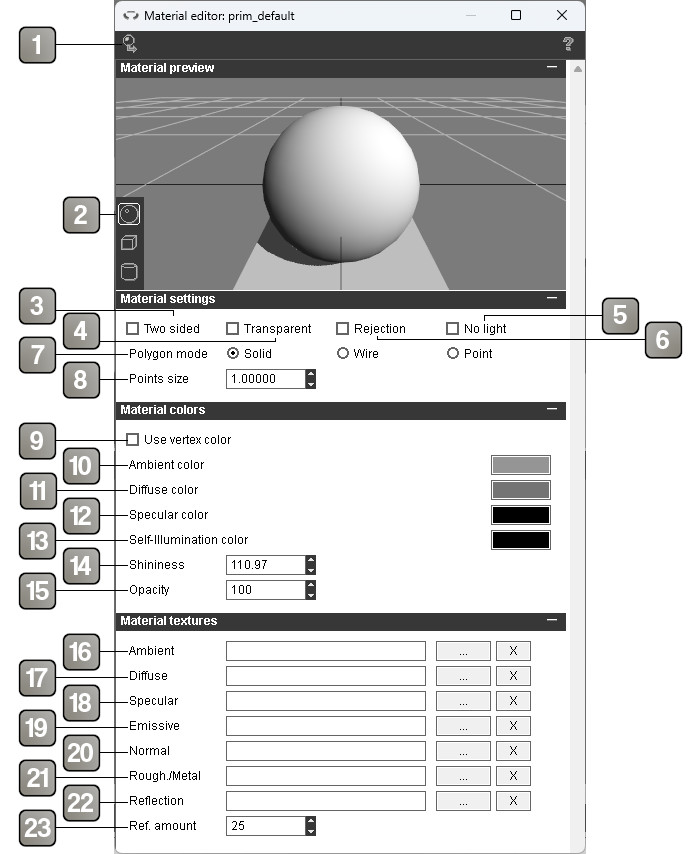
Interface description |
|
1 |
Applies the material on the current selected object. |
2 |
Changes the object used for material preview. |
3 |
Polygons with this material assigned will be rendered on their two sides. |
4 |
Activate the material's transparency. |
5 |
Alpha rejection. Use the alpha of the texture to create a transparency. |
6 |
This material is not affected by lights. Blocks all colors options. |
7 |
Render mode. Options are "Solid" (complete render), "Wire" (edge render only) and "point" (Points render only). |
8 |
Points size for the render mode "point". |
9 |
Use the color of the vertices to define the color of the material. Block ambiant and diffuse colors options. |
10 |
The color of the material when lighted by ambiant light. |
11 |
The color of the material when lighted by direct light. |
12 |
The light's specular reflection color on the material. |
13 |
The color of the light emitted by the material. |
14 |
The shininess of the material. |
15 |
The opacity of the material. The "Transparent" checkbox needs to be checked in order to see the effect. |
16 |
Ambiant texture. Define the appearence of the material when lighted by ambiant light. |
17 |
Diffuse texture. Define the appearence of the material when lighted by direct light. |
18 |
Specular texture. Define the reflection of the light on the material (Not used when an Roughness / Metalness texture is applied). |
19 |
Emissive texture. Define the light emission of the material. |
20 |
Normal texture. Define the relief of the material and allows to add details. |
21 |
Roughness and Metalness texture. RGB texture, the Green channel contains the roughness values, the Blue channel contains the metalness values, the Red channel is unused. |
22 |
Reflection texture. Define the reflections of the material. |
23 |
Amount of reflection. |